Saturday, November 27, 2010

FIRST PROFESSIONAL PORTRAIT PHOTO SHOOT

This evening, I had the honor of photographing a young couple I know. They were here in the neighborhood visiting for the holiday, so I asked if they would be interested in being guinea pigs for me to practice my portrait photography skills. They happily obliged. They were so easy to photo, and both have incredible smiles. They were such a pleasure to work with.


Thank You Josh and Erica.

Tuesday, November 23, 2010

A NEW APRON AND PEANUT BUTTER CUP COOKIES

Thanksgiving is in two days (Wow, where has the year gone?) This year, we are spending the holiday with good friends of ours, the Myers. I can't even begin to tell you how excited I am about that. Last year, it was just the four of us, which was wonderful, but it's SO nice to be able to share the day with such great friends. Tomorrow night, another couple of our friends are hosting Happy Hour for those of us who are staying in the hood. They're smoking a briskette (sp?), so I thought I'd bring something sweet. (I'm also responsible for all desserts for Turkey Day - I'll be baking ALL afternoon tomorrow). So since tomorrow will be consumed with Turkey Day treats, I baked Happy Hour treats today.

First, I donned my new Apron. I want to thank Larissa at Just Another Day in Paradise for the inspiration. She blogged about her new apron that she made out of a placemat from Walmart. I had seen those same placemats and thought they were really pretty. After seeing her post, I went back to get one. To my delight, they were on clearance, and I got mine for $1.50. I came home, added some ribbon for the tie, and Voila... A new Apron.
Before I started baking, I solicited some help.
I outfitted my 3 year old, Luke, with his own apron and put him to work.
His help lasted until I started using the mixer. He's not a fan of loud noises. I know, a mixer's not loud, but I guess to him it was.

We made Peanut Butter Cup Cookies. I want to thank Amy at The Idea Room for the recipe.

They were super easy, with the most time consuming part being cutting up the PB cups.

I thought I would share the recipe with you. You could easily whip some up for this holiday weekend.

Ingredients:
1-1/2 cups all-purpose flour
1 teaspoon baking soda
1/2 teaspoon salt
1/2 cup (1 stick) unsalted butter, at room temperature
3/4 cup dark brown sugar ( I don't think mine was "dark")
1/2 cup granulated sugar
1 large egg
1 teaspoon pure vanilla extract
1 12-once package of small peanut butter cups - chopped into quarters

Directions:
Heat oven to 375
Line 2 baking sheets with parchment paper (I didn't do this)
In a large bowl, whisk together the flour, baking soda and salt
Using an electric mixer, beat the butter and sugars until creamy. Add the egg and vanilla and beat to combine. Gradually add the flour mixture, mixing until just incorporated.
Fold in the peanut butter cups.
Drop tablespoon-size mounds of dough 2" apart onto the baking sheets
Bake for 9 minutes (the original recipe said to bake for 12-15 minutes - mine at 9 minutes were perfect. I think 12-15 to burn them)

Yields about 3 dozen

Hope you try them. They're Yummy!!


Saturday, November 20, 2010

OLD TURNED INTO NEW... GOTTA LOVE IT!!

About a month ago, I purchased these cute little wedges at a local department store called Peebles. Do you have one of those in your town? It's like a mini Kohls. It opened in our tiny rural town about 18 months ago, and I have gotten a lot of great deals there.
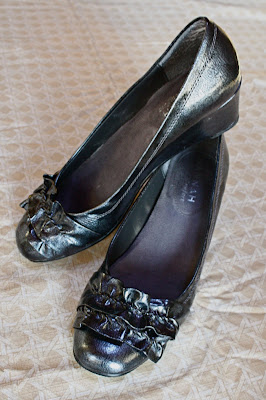
Aren't they Totally Fabulous? Normally, I don't go for metallics or patent leather, but the Pewter color of these... well lets just say, I completely fell head over heals in love, and the ruffle detail is to Die for.

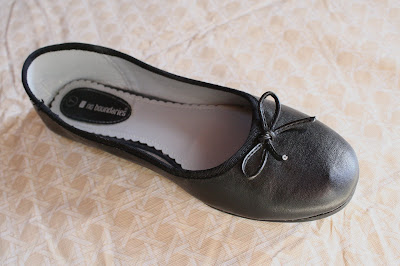
Because of my recent sewing successes, and my love for the ruffle detail on those shoes, I thought I might try to dress up a pair of simple little black ballet flats I own.

Here is the "Before" shoe... basic black flat from Walmart (or maybe Target).
Here is the "After Shoe"... another Totally Fabulous shoe with the ruffle detail to Die for.
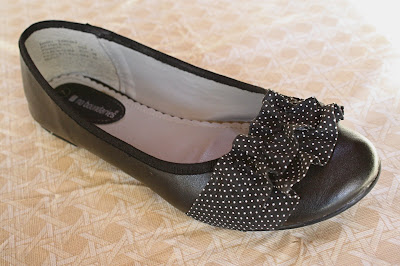
Sorry for the lack of step by step photos, but I was kind of winging it as I went. Basically, each shoe has two strips of fabric that are ruffled in the middle.

1). I cut (4) strips of scrap cotton fabric, each 1-5/8" x 9", which I then folded and pressed the long raw edges 1/8". I used a little bit of fabric glue to hold the fold.
2). I then folded a strip in half and measured down 2.5" from the fold, and that's were I started my gathering stitch.
3). Holding the strip flat in my hand, I did the gathering stitch for five inches. I knotted the thread at the start of the stitch, and once I had gathered the material to the desired ruffle fullness, I knotted the other end.
4). I then repeated the process on the three remaining strips.
5). I took one strip (the bottom one) and positioned it on a shoe. I held it in place with tape while I marked where the excess fabric would be cut off at the sole.
6). I then cut off excess on one side.
7). I hot glued the strip in place on that side, at the sole.
8). I pulled the strip tight and marked and cut the excess on other side, at sole.
9). I then hot glued the strip in place on that side as well. I also added a little bit of glue on top of the shoe to help hold the ruffle in place.
10). I then repeated steps 5-9 for top strip. Once everything was positioned to my liking, I added a little bit of glue under the flat edges of the top strip and the exposed edge of the bottom strip.
11). I then did the other shoe.

And Voila...
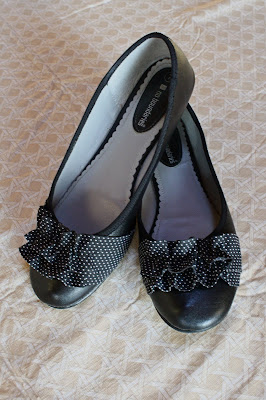
I think they're pretty darn Cute!!
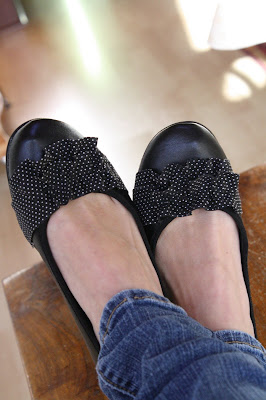
And BTW, to go along with my cute "New" old shoes, I followed Rachel's tutorial at Holy Craft on how to turn an old pair of jeans into "New" Skinny Jeans.

So this morning, while my husband hunted, I kept myself busy. After loading the dishwasher, scrubbing the toilets, and feeding my two youngins lunch, by 2:00pm, I had two "New" fashion items using "Old" things I already owned. An adorable pair of shoes and a great pair of jeans.

I'm linking up here... be sure to go check out all the other awesome ideas.
Join  us Saturdays at tatertotsandjello.com for the weekend      wrap    up           party!UndertheTableandDreaming mmm button
giveaways

This project was Featured here...

Friday, November 19, 2010

CHRISTMAS PURSE - A MODIFIED REBECCA

Last week, when Sourkraut (I'm assuming that's not your real name?) over at Langes Fadchen, Faules Madchen posted that Bev at Flamingo Toes was offering the opportunity to download one of her purse patterns for free, I jumped on it right away. I also follow Flamingo Toes, but I had missed this particular post. Anyway, since I have my own little purse shop on Etsy, I wanted to try to make Bev's cute Rebecca Shoulder Bag. Be sure to go to the link above to see the original.

I had just finished some custom purses for an Etsy client, and I had a bunch of this fabulous green fabric left over (thank you Laura). Then I remembered, that a friend of mine had given me a bunch of fabric, in which there was this really cool red and white faces pattern (thank you Heidi). Hmmm... red, white and green? I could make a way funky Christmas purse.

So I had the fabric, but I didn't have a zipper or strap rings, and I wasn't going to be at a fabric store anytime soon. The Rebecca would have to be modified. After my success at making my Princess Leia gown without a pattern, my confidence for this modification was high.

Here is my version of Rebecca...
Since there was to be no zipper, I had to come up with another closure method. I copied the ruffle detail from the front, and added it to the back - with extended length, to create a flap. I figured, since I will only be carrying this bag one month out of the year, a zipper for ensuring secured purse contents, would not be missed.
Since I had no strap rings, a big modification would have to be done to secure the strap. I cut the strap to the same length as the pattern indicated, but I pleated the sides of the purse to make their width match the width of the strap. My overall strap length is shorter than the original, but it works great.
The inside of the bag is constructed as the pattern indicated. Love the detailing on the pockets.
Since I also did not have any type of snap closure, I just used velcro to hold the flap in place. I then made a rolled fabric flower out of some coordinating Christmas fabric I had, to dress the flap up a bit.

So what do you think? If I were to make this again, I would definitely add some interfacing throughout to make it a little sturdier. I'm sure the zipper would help with that, but honestly, I'm not a fan of sewing in zippers.

Bev and Sourkraut, thanks for the inspiration

I'm linking up here... be sure to go there to check out all the other incredible projects.

This project was Featured here...

Friday, November 12, 2010

MY MAYFLOWER

Last Friday, over at The Pink Peony of Le Jardin, I saw Robyn's creation of The Mayflower after she was inspired by seeing Pottery Barn's version. After I saw that, I just knew I wanted to try to make one. I loved the fact that she used a bamboo placemat for the ship, but I had to use what I already had, so I dug into my scrapbook paper supply.

Here's my version...
I did however, go out and buy the blue glass rocks. I had this vision of the ship being in the water and beached at Plymouth Rock.
I had a pair of linen pants, that I had attempted to make probably 15 years ago, that I cut up and used for the sails.
After looking at some pictures on the internet, I knew I wanted to have some Port Holes.

Someday, when I just whip something up, I'll try to make the effort to record the step-by-step process so I can do a tutorial.
I love how the glass beads are creating a reflection like water on the side of the boat. Do you think my "Plymouth Rock" is corny?

I also found these two little pilgrims at the Dollar store. I think they totally add to my little historical moment.

I'm linking up here. Go check them all out to see all the other incredible creations.
Join  us Saturdays at tatertotsandjello.com for the weekend     wrap    up           party!UndertheTableandDreaming mmm buttongiveawaysCatch a Glimpse button


This project was Featured here...
UndertheTableandDreamingA Glimpse Inside featured button
Related Posts with Thumbnails